TimeTec – Profile Layouts and Data Fields
This post was originally published in June 2016 and was updated in Jan 2019.
Note:
Please note that the information and images below refer to TimeTec TA software. However, this particular module/ feature is also available in TimeTec Patrol and TimeTec Leave with the same rules and functionality, hence you can also use this as reference for all three abovementioned softwares.
Introduction
TimeTec TA has launched a new feature which conveniently allows the admin to add data fields in the user profile layout.
Benefits
Some companies require different types of information. TimeTec TA System Admin will be able to customize accordingly the additional data fields to match company preconditions in the user profile layout and determine the viewing rights between admin views and normal user views.
Process
To customize the Profile Field layout, here’s what you need to do:
Step 1 > Set Data Field
Set the additional data fields you require, for example Marital Status, Insurance No., Passport No, Spouse Name, etc.
Step 1.1 > Go to Company > Profile Field > ‘Manage Data Field’ tab. Click on the Add Button
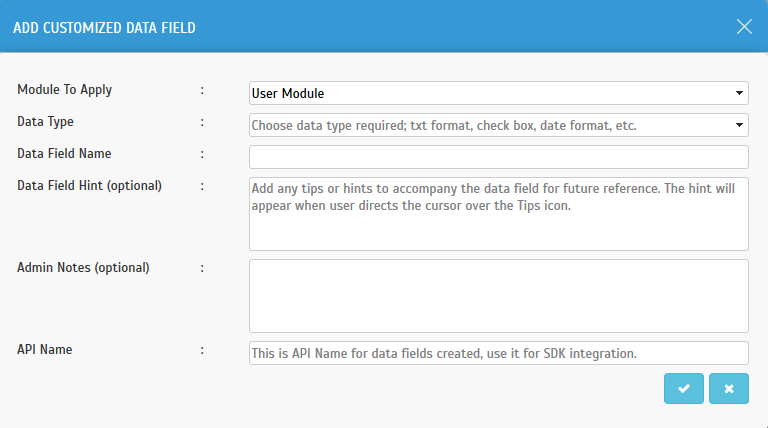
Step 1.2 > Add Customized Data Field

Description:
Module to Apply - User Module (This feature only supports to add customized data field in the user module)
Data Type – Users may select the
data type they require
·
Text - Single line textbox that may contain
up to 2000 characters
·
Text(Multiple Lines) – Multi line textbox
that can contain up to 2000
characters
characters
·
Check box - A field that can have two
posibble values. Examples "True or False" ,
"Yes or No"
"Yes or No"
·
Date - A date field where you can configure
to suit your requisite
·
Date and Time - A date and time field with a
date and time selector
·
Email - Input field that should contain an
email address
·
Number - A number
·
Pick List - Selection from a list of custom
values
·
Pick List (multiple selection) - Multiple
selection from a list of custom values
·
Url - A Web link of which when its clicked,
it navigates to the appropriate
page
page
·
Label – A bolded text used to indentify
something
Step 2 > Add Data Fields into Profile Field
The data field you created should appear here. Select the data field and apply them to the Default or a new Profile Field. Once completed, you can assign users to the profile. User view will be limited to the Profile Field assigned to them respectively.
Note: One user can only be assigned to one profile field.
Step 2.1 > Click Add/Edit Button
Step 2.2 > The Created Data Field Will Appear Here
Step 2.3 > Under the Edit Profile Field settings, you can:
· Select Admin or User view
· Apply data field to the Profile Field
Displayed on the left column (Circled in Blue), is your Customized Data Field that can be added into the Profile Field.
> Drag and drop any required data field from the left column to the right column.
> You can also remove data fields from the right column using same method (drag and drop to the left column) or clicking on the Disabled button.
Step 3 > You May Check the Data Field in the User Layout
Click User > Manage User > Click Edit


0 comments:
Have any questions or inquiries about FingerTec? Drop your input here.