How to Solve “Load Default Device Detail Error” in Ingress Software (MySQL)

Thursday, November 19, 2020 TimeTec 0 Comments


Introduction
There was feedback from Ingress Software users about ‘Load Default Device Detail Error’. This error is prompted when the user clicked on Device tab, and it has caused missing clocking data in Ingress software and the user is not able to do any changes at the device settings. This issue occurred due to the missing table in the Ingress database. 

This article will guide users to solve the ‘Load Default device Details Error’ in Ingress software.

Process
1. Please download and install SQLYog Community software from the link below. You can choose to download the software based on your PC operating system.
    a) SQLYog installer (64-bit operating system)
https://s3.amazonaws.com/SQLyog_Community/SQLyog+12.2.1/SQLyog-12.2.1-0.x64Community.exe

2. Please follow the steps below for the SQLYog Community software installation process. 


3. Once you are done with the installation, please click on SQLYog Community icon.


4. Click the New button and insert MYSQL password. After that click Test Connection to check whether the connection to the MYSQL database is successful or not. Then, click Connect.


5. Now, you can see the SQLYog Community software in the picture below.


6. Click on Ingress > Go to Query section > Please type query as listed below > Click Execute Query (F9) 

    ALTER TABLE device add Column [EnableRealTime] int;


    ALTER TABLE device ADD COLUMN LastDownload text(20);


7. Then, you need to run Ingress DB Installer to upgrade the database after successfully running the query. Open Ingress DB Installer > Insert MYSQL password > Test Connection > Update Connection > Upgrade Database.

8. Finally, you can open your Ingress software and check if the Load Default Device Details Error message still prompts out. If you have already followed all of the above steps and still are unable to resolve this matter, we recommend that you contact your local reseller or email us at support@fingertec.com to get further assistance. 

Note: If some of the screenshots or steps viewed here are different from the ones in the current system, this is due to our continuous effort to improve our system from time to time. Please notify us at info@timeteccloud.com, we will update it as soon as possible.

0 comments:

Have any questions or inquiries about FingerTec? Drop your input here.

i-Neighbour : BLE-2 Deployment in Controlling Visitors' Car Entry & Exit for Gated and Guarded Community

Thursday, November 19, 2020 TimeTec 0 Comments


Introduction
Even with the current advanced Visitor Management System implemented in respective gated guarded communities, issues caused by human behaviour still tend to occur daily. Guards are still granting visitors entry without going through proper registration in the system.

TimeTec BLE-2 is a device meant to be an intermediary between i-Neighbour guard panel and a barrier gate controller, intending to automate and monitor the opening of the barrier gate upon registration of a visitor through the i-Neighbour Visitor Management System using Bluetooth Low Energy (BLE) technology. 

In this article, we cover topics as follows:

    1. Benefits of using TimeTec BLE-2 and the challenges it overcomes  
    2. How it connects to the barrier gate & i-Neighbour Visitor Management System (i-Vizit)


BLE-2 Benefits
Facilitate the workflow of security guards - Guards will no longer need to press on the push button to open the barrier gate after registering a visitor. With BLE-2 installed, the guards will only have to register the visitors via i-Vizit system and the barrier gate would automatically be raised allowing the visitor to enter.

The Challenges it Overcomes 
The push-button can also be locked to prevent guards from using the push button to open the barrier gate manually to improve security. This way, we can ensure that the guards will be compelled to register the visitors before allowing them to enter the compound. Hence, it prevents guards from manually pressing the push button, bypassing the system to grant visitors entry without registration.


How it connects to the barrier gate & i-Vizit.
BLE-2 I/O is connected to the barrier gate via a push button. Upon completing the registration process, i-Vizit will send a signal to BLE-2 via Bluetooth Low Energy network. BLE-2 will then trigger the push button to open the barrier gate.

Note: If some of the screenshots or steps shown here are different from the current system, this might be due to our continuous effort to improve our system from time to time. Please notify us at info@i-neighbour.com, and we will update it as soon as possible.

0 comments:

Have any questions or inquiries about FingerTec? Drop your input here.

Enhancement of Import Users in TimeTec Solutions

Wednesday, November 18, 2020 TimeTec 0 Comments


Introduction
Now, with TimeTec, you can import a maximum of 1000 users at a time. You can also use this feature to update existing users’ information such as Alias, Date of Birth, Gender, Nationality, and etc, easily and in bulk. The Import User feature is available in TimeTec TA, TimeTec Leave, TimeTec Access, TimeTec Patrol and TimeTec Profile.

Process
Go to USER > Manage User

Click on Manage > Import User

Click on “Download .xlsx sample here “ to download sample for users import template file

Before you upload the file, it is better to separate your user lists into different sheets, according to your Organization Structure

These are the compulsory data to have:
    1. Name
    2. User 
    3. Account Issuance date
    4. Group Duty Roster
    5. Login username [email] (Only applicable for users allowed for web or mobile app access)

To import the file, click on Manage > Import User > browse and select the import file.

Match the header to the data fields available in the User Profile section. This action will tie-up the data from each column to the correct data fields. Repeat the same steps if you have separated the user information into different sheets. Ignore sheet that is not relevant/applicable. You can update users organization structure later at Company > Organization Structure


Before finishing the steps, please check the validity of your user information before you import them into the system to avoid future problems.

Account Activation
TimeTec Account Activation can be done either by Email or Manual Activation. Please select the preferred method of activation as listed below:


Email Activation (Recommended)
The system will send Account Activation Email to  all new users’ email addresses. Users will have to access their email, click Activate Account and set a new password to access TimeTec. The system will send the Activation Emails to new users only and will not affect the existing users.

Manual Activation Sample file
For this option, the system will generate a random password for the first time login. This applies to new users only, it will not affect existing users and it will not replace the password of the existing users. The generated file can be downloaded ONLY ONCE. To set a temporary password again, go to User > Manage User > click Edit > and go to User Information section > set new temporary password.
After confirming  > click on “Import” and Generate users attendance.


Note: If some of the screenshots or steps viewed here are different from the ones in the current system, this is due to our continuous effort to improve our system from time to time. Please notify us at info@timeteccloud.com, we will update it as soon as possible.

0 comments:

Have any questions or inquiries about FingerTec? Drop your input here.

“NOT MY VISITOR” - Report Wrongly Check-In Visitor in i-Neighbour

Tuesday, November 17, 2020 TimeTec 0 Comments


Introduction
There are cases where visitors submit wrong unit numbers during their visit registration, and this usually happens in neighbourhoods that do not have an intercom, guards do not have the means to verify this information and therefore, registered those visitors with the wrong unit  number information. 

Now, i-Neighbour have added a feature to allow unit owners to report if the registered visitors are not theirs. Unit owner can click “Not My Visitor” button, and a report will be submitted directly to i-Neighbour Admin (Web) and Security Guard (i-Vizit app).

Process
Once a visitor is successfully registered at the guardhouse tablet, the Unit owner will receive a notification informing him that the visitor has checked-in.

STEP 1
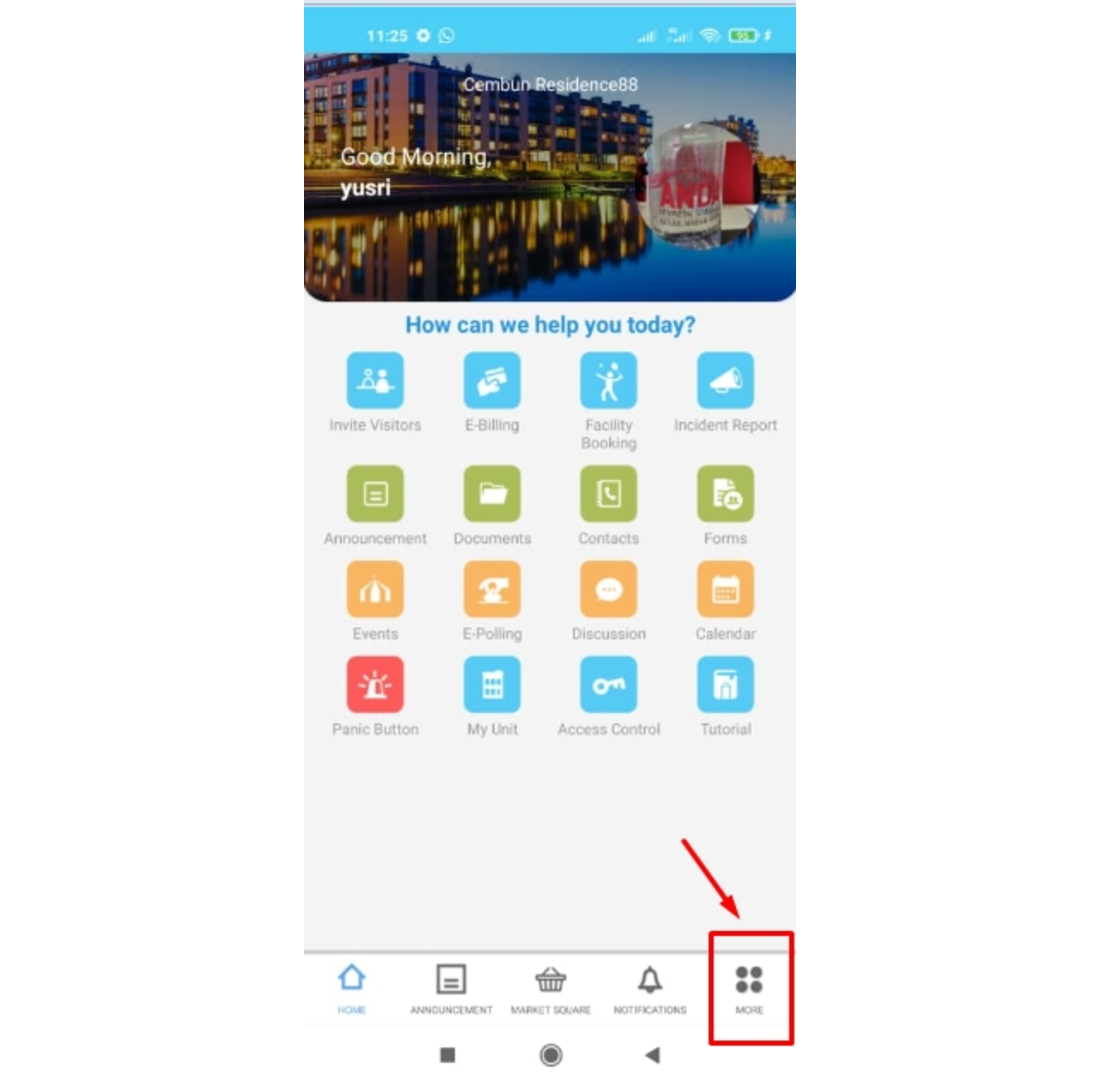
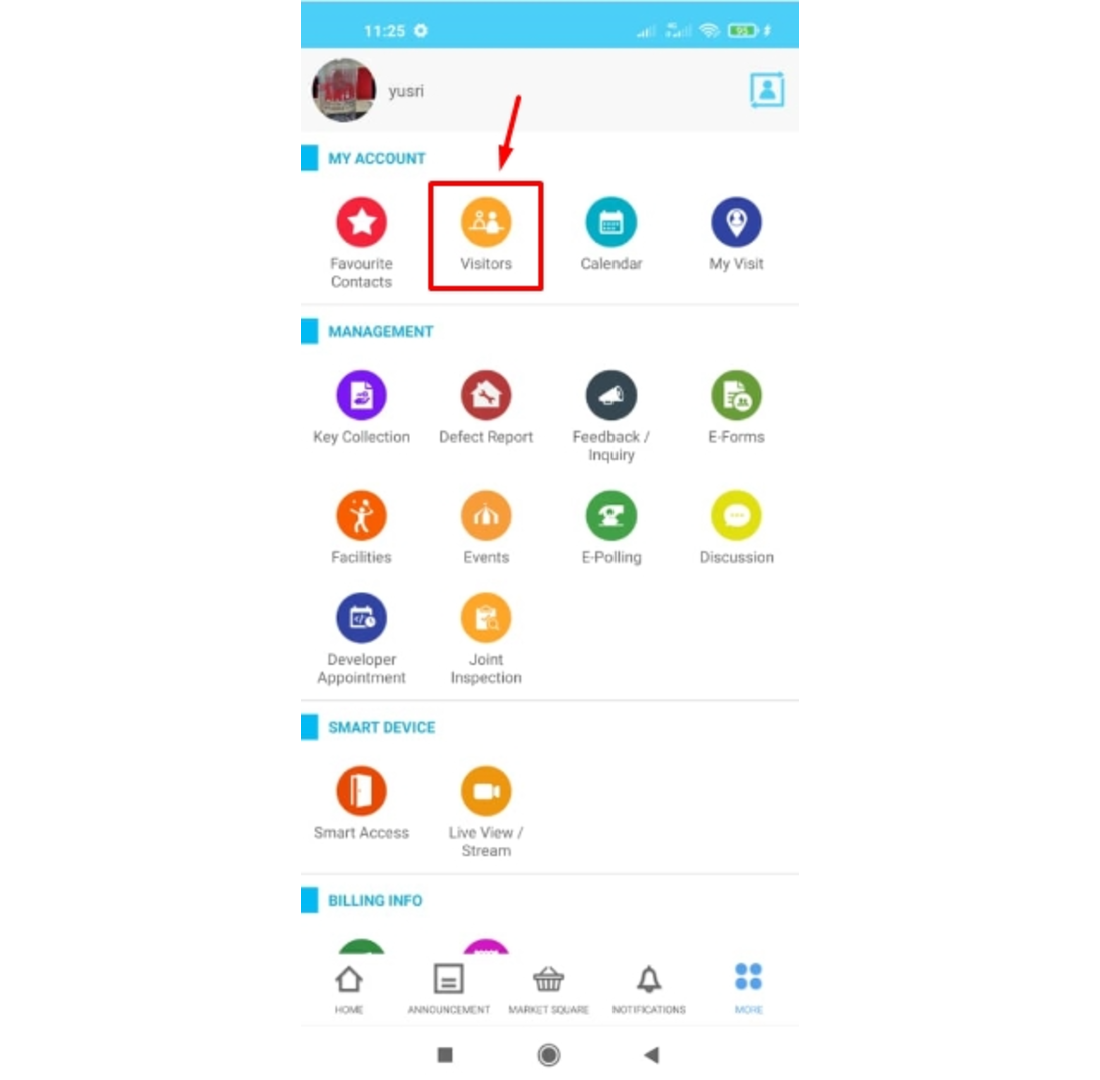
At the homepage, press the “More” button then select “Visitor”, to show the details of the visit.


STEP 2
There are 3 categories Under “Visitor” :
    1. Upcoming - Displays all upcoming visitors details including invited visitors. 
    2. Checked-in - Displays all visitors that have registered at the guard house. 
    3. History - Displays all visitors that have already checked out from the neighbourhood. 
                        The data are available for a period of 2 years.

When you receive a “Checked-in” notification, the details will be shown at the “Checked-in” category. When you receive “Checked-out”, the details are available at the “History” category.

STEP 3
Click at the visitor name > Click “Not My Visitor”


STEP 4
Click “Report” to notify Admin and Guard


STEP 5
Click “Yes” to confirm


STEP 6
Click “OK”. You have successfully reported this visitor’s status to the Admin and Guard


When the same visitor comes back, the system will not show the previously registered unit number in the visitor registration form. The guard will have to ask the visitor for the correct unit number that he/she wants to visit.

Note: 
If you are still having problems after completing all of the steps stated above, please contact us via support@i-neighbour.com.

If some of the screenshots or steps viewed here are different from the ones in the current system, this is due to our continuous effort to improve our system from time to time. Please notify us at info@i-neighbour.com, we will update it as soon as possible.

0 comments:

Have any questions or inquiries about FingerTec? Drop your input here.

How to Create Organization Structure in TimeTec VMS

Tuesday, November 17, 2020 TimeTec 0 Comments


Introduction
Creating the organization structure of your company in TimeTec VMS allows you to assign staff to specific departments accordingly. Staff can be easily identified based on the department show on their profile, making it more efficient and systematic for allocation and arrangement. This article will be providing guidance on the steps to create an organization structure in TimeTec VMS.

Process
1. Once you have logged in into the Admin account, go to Staff > Organization Structure


2. You may create your organization’s branches, departments or sections by right clicking on the company name on the left panel. Click on Add Division to create a new division. 


3. Insert the name of the created division and then click save. To add a sub-level division, right click on the name of the department and click Add Division. You can add and rename the division in the Organization Structure as necessary.    


4. Once the division has been created, you can add staff by clicking on the relevant department. This can be found on the left panel. Then, click on Assign Staff on the right panel.


5. Select user(s) to be assigned to the selected department, and click Save.

6. To remove any assigned users from the department, click on the department on the left panel > Select staff > Remove Staff.


7. Once this step is completed, the allocated department for each staff will show accordingly in the Staff Listing.


 8. If the Pre-Register or Queue Relief features are enabled, visitors will have to key in the host’s department during the registration. 
Please note that visitors will have to insert the correct department name when filling up the self registration form. Visitors may request the information from their host.


Note: If some of the screenshots or steps viewed here are different from the ones in the current system, this is due to our continuous effort to improve our system from time to time. Please notify us at info@timeteccloud.com, we will update it as soon as possible.

0 comments:

Have any questions or inquiries about FingerTec? Drop your input here.

How to Update User Information in TimeTec TA App

Monday, November 16, 2020 TimeTec 0 Comments


Introduction
User information is an essential requirement for registering employees during the onboarding process and even for future company reference use. More particularly when it comes to determining users’ privileges as an employee in the company. This includes preferences, personal identifiable information such as name, mailing address, email, etc..

By default, only Admins are allowed to edit user's information in TimeTec solutions. However, there is an option available in TimeTec Profile settings that allow users to edit their personal information in the TimeTec App which makes it more convenient to make relevant updates anytime and anywhere.  

Process (To be done by Owner/Admin of TimeTec Profile)
1. Login to the TimeTec web page and go to TimeTec Profile Module.


2. Go to COMPANY > System Settings


3. At the Profile Management setting, click the ‘Pencil’ icon to edit.


4. Turn on the ‘USER EDIT PROFILE’ and click the ‘Tick’ button to save.


5.At the ‘PROFILE FIELD’ page, click the ‘Pencil’ icon to manage the Data Field tab.


6. Set privileges for selected users to allow them to edit their user information. Please ensure that you have selected ‘User View’ before proceeding.
*Note: Customize and organize your Profile Field by adding or removing the data field(s). 
elect and transfer the customized data field(s) created into the current profile field. Arrange the Sequence of each field accordingly


7. For the rest of the Profile Fields, you may also amend to Enable/Disable the Field section. Choose the fields you need and determine whether the fields are compulsory.


8. Once all the customization has been completed, click on the ‘Tick’ button to save.


Update User information in the TimeTec TA App (User Module)
1. Click on your profile name.


2. Click on the profile details icon (on the Red Box).

3. Fill in your TimeTec TA account password to view your full profile. Press ‘Yes’ to proceed.


4. Click the ‘Camera’ icon to upload/update your profile picture and the ‘Pencil’ icon to edit your details.

5. To give an example, click on the ‘Pencil’ icon on ‘PERSONAL INFORMATION’. It will display the personal information that has been set in your privileges to allow you to edit your user information. Press the ‘Tick’ icon to save the edited information. 


6. Once you have saved the edited information, you can trace it easily from your Profile.


Note: If some of the screenshots or steps viewed here are different from the ones in the current system, this is due to our continuous effort to improve our system from time to time. Please notify us at info@timeteccloud.com, we will update it as soon as possible.

0 comments:

Have any questions or inquiries about FingerTec? Drop your input here.