[i-VIZIT APP] VISITOR REGISTRATION - MAKING VISITOR PASS COMPULSORY

Friday, April 23, 2021 TimeTec 0 Comments


Introduction
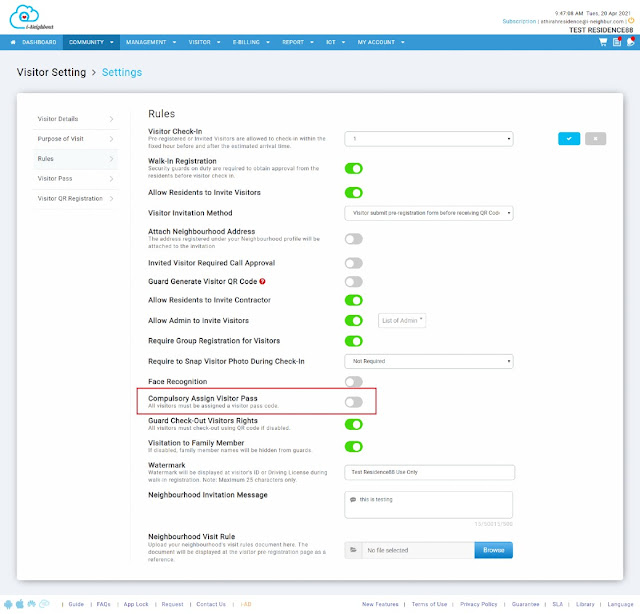
In the latest i-Neighbour enhancement, there is a new feature under visitor rules. This feature lets the admin select whether Visitor Pass should be compulsory or not.

After enabling this option, the i-Vizit application (Guard House tablet) will prevent a security guard from pressing the check-in button without selecting a visitor pass.

It is easier for the security guard to determine which car/person the visitor is and ease the checkout process by having a visitor pass. 

For example:
If the guard post is busy with visitors checking and out simultaneously, the security guard can collect the visitor passes from the checking out visitors and let them exit the compound and carry on with the ongoing registrations of the incoming visitors. Later, when the guard post is less busy, the guard can check out those visitors from the system using the visitor passes collected. Without Visitor Passes, the security guard might overlook who have checked out the residence.

Process
1. To enable “Compulsory Assign Visitor Pass”
COMMUNITY > SETTING > VISITOR SETTING > RULES > EDIT > Enable this setting;

2. At the i-Vizit application (Guard House Tablet) , Press Synchronize/update to refresh the application
HOMEPAGE > SYNC ICON > UPDATE


3. During the registration process, if the security guard directly presses the Check-In button without selecting a visitor pass, the system will show this message.


Note: If some of the screenshots or steps viewed here are different from the ones in the current system, this is due to our continuous effort to improve our system from time to time. Please notify us at info@i-neigbour.com, we will update it as soon as possible.


0 comments:

Have any questions or inquiries about FingerTec? Drop your input here.

[Admin Guide] How to Create An Event in i-Neighbour

Friday, April 23, 2021 TimeTec 0 Comments


Introduction
i-Neighbour makes event management easier for the management. All the admin needs to do is to create an event, and invite the residents to join, all through i-Neighbour App. This tip is to give Admin an idea how to create an event through the web portal.  

Process.
1. Login Admin and go to Management > Manage Event


2. At the top right click Add Event


3. Fill up the required information. You can enable registration/fee if any. Click submit to create an event.


4. Click = icon to view the event.


5. Admin can view the number of participants and the participant details.


If you are still having problems after completing all of the steps stated above, please contact us via support@i-neighbour.com. 
 
Note: If some of the screenshots or steps viewed here are different from the ones in the current system, this is due to our continuous effort to improve our system from time to time. Please notify us at info@i-neighbour.com, we will update it as soon as possible.

0 comments:

Have any questions or inquiries about FingerTec? Drop your input here.

Ingress / TCMSv3 - What is a Differential Overtime?

Friday, April 16, 2021 TimeTec 0 Comments


Introduction
Differential overtime is secondary over time that the company defines for different pay rate purposes. In some companies, their employees are given a different overtime rate after a particular work period.
The Diff. OT column is only displayed if you have configured the Diff. OT setting in your Clocking Schedule. Below are the steps to configure it.

Process
1) For Weekly type schedule:
Set the ‘Overtime Differential Rate Interval’ option under the Overtime tab 

For Flexi type schedule:
Set the ‘Differential overtime if total flexi-work hour exceeds workhour of’ option under the Over time tab 

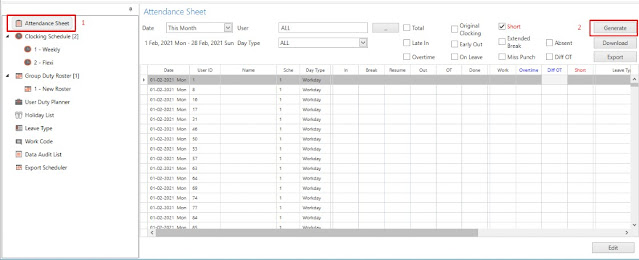
2) Generate the Attendance Sheet to apply the differential overtime setting

Select user(s) > Specify the date range for the data to be generated > Click the OK button to generate the attendance 

3) There is a new column, “Diff OT”, which appears on the Attendance Sheet. The software splits the OT hour with normal rate and differential OT into two columns, making it easy for viewing and reading.


Note: If some of the screenshots or steps viewed here are different from the ones in the current system, this is due to our continuous effort to improve our system from time to time. Please notify us at info@fingertec.com, we will update it as soon as possible.

0 comments:

Have any questions or inquiries about FingerTec? Drop your input here.

Device Connection Notification in AWDMS for Smart AC1 Series and Face ID 5 Series

Thursday, April 15, 2021 TimeTec 0 Comments


Introduction 
By configuring this setting in AWDMS, you can receive notification regarding the device connection. The administrators will be notified through this feature when any of the devices lost connection and re-connected back to AWDMS software.
 
Steps
1) Configure the email setting
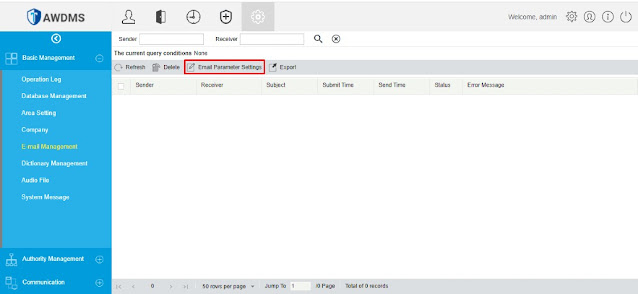
First, you need to configure your email account within AWDMS for it to send notification via email. To do so, go to System > Basic Management > Email Management > Email Parameter Settings > Insert SMTP Server, Port, Email Account, Email Password > Click Test Connection.


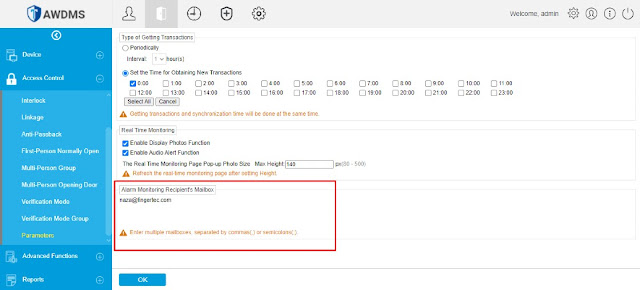
2) Go to Access module > Access Control > Parameters > Insert the recipient email address in the Alarm Monitoring Recipient's Mailbox.

 
3) And if the device is disconnected, the AWDMS will send an Email Notification to the recipient email to notify them of the news. 

Note: If some of the screenshots or steps viewed here are different from the ones in the current system, this is due to our continuous effort to improve our system from time to time. Please notify us at info@fingertec.com, we will update it as soon as possible.

0 comments:

Have any questions or inquiries about FingerTec? Drop your input here.

How to Set Working Locations in TimeTec TA

Thursday, April 15, 2021 TimeTec 0 Comments


Introduction
These days, social distancing, self-isolation, or quarantine requirements have left many organizations with a physically dispersed workforce. Most have a significant percentage of staff having to work from home. For TimeTec TA subscribers, the clocking method for employees working away from the office may have also evolved to mainly GPS mobile clocking.
 
To help Admins or Managements monitor their worker’s daily work location, we introduced a new ‘Working Location’ feature. Admins can add multiple working locations for categorization/ classification purposes and tag these to the various clocking methods available in their account.
 
The system will then display a Working Locations Chart (at Admin Dashboard) with the clocking data organized according to those preset working locations.

Process
A. Add the ‘Working Locations’
1. Go COMPANY > Work Locations Settings


2. The system provides 3 default working locations (Work from home, Work on site, Work in office) that are editable but not removable and allows Admin to add new working locations (30 max).
 ‘+’ Icon: To add new Work Location
 Pencil Icon: To Edit Work Location Name or Description
 Dustbin Icon: To Delete the Work Location


B. Add ‘Working Locations’ to GPS Geofence
1. Go to DEVICE > Mobile Clocking > GPS Geofence

2. Click the ‘Pencil’ Icon to add the working location

3. Select the Working location and click ‘Submit’


C. Add ‘Working Locations’ to NFC/Beacon
1. Go to DEVICE > Mobile Clocking > NFC | Beacons.

2. Click ‘Pencil’ icon to edit work location and click ‘Update’ icon to save

 
D. Add ‘Working Locations’ to NFC/Beacon
1. Go to DEVICE > Mobile Clocking > WiFi Access Point

2. Click ‘Pencil’ icon to edit work location and click ‘Tick’ icon to save


E. Add ‘Working Locations’ to Webster/Smart DBS Terminal
1. Go to DEVICE > Terminal

2. Click ‘Pencil’ icon to edit work location and click ‘Tick’ icon to save


F. Add ‘Working Locations’ to QF Master
1. Go to DEVICE > QF Master

2. Click ‘Pencil’ icon to edit work location and click ‘Tick’ icon to save


WORKING LOCATION ANALYSIS - WEB VERSION
1. At the Home page > click on ‘Work Location Analysis’

2. Select date to review employees’ work location. The chart will display the work location records based on the employees' latest clocking data.


3. Data Grid
• Allow Admin to view users’ clocking categorized under each working location.
• Included View Attendance button to redirect to Attendance module.
• Included Print button to generate and download user list as PDF


WORKING LOCATION ANALYSIS - MOBILE APP
1. If the user clock-in outside the GPS Geofence area, they are required to define their working location manually.


2. For further analysis of ‘Working Location’, go to ‘Home’ > Swipe to the left


3. You may select each of the region or working location to check the list of users


Note: If some of the screenshots or steps viewed here are different from the ones in the current system, this is due to our continuous effort to improve our system from time to time. Please notify us at info@timeteccloud.com, we will update it as soon as possible.

0 comments:

Have any questions or inquiries about FingerTec? Drop your input here.

How to Set Multiple Meeting Locations in TimeTec VMS

Wednesday, April 14, 2021 TimeTec 0 Comments


Introduction
A feature in TimeTec VMS, which is Multiple Addresses, can be utilized for a company with multiple branches at different locations that allows the admin to set an address for each block, representing premises at different locations or branches. With the feature, employees assigned to the block will have their office address tally with their actual work address. Hence, when the employee is inviting visitors, the correct office address will appear on the visitor's invitation message. The employees are also given the option to select the meeting location when creating an invitation or confirming an appointment. Following will be the detailed steps on setting up and using this feature.

A. Setting Building (Location) Address
1.       In TimeTec VMS, login as Admin, Go to Manage Company > Building


2.       Click Add Block to add new building/branch


3.       Insert details accordingly. Tick for the same as default company information if the location address and other details are similar to the current company details. Otherwise insert the new details accordingly. Then click on Next.


4.       Set the Level and Unit No. accordingly.


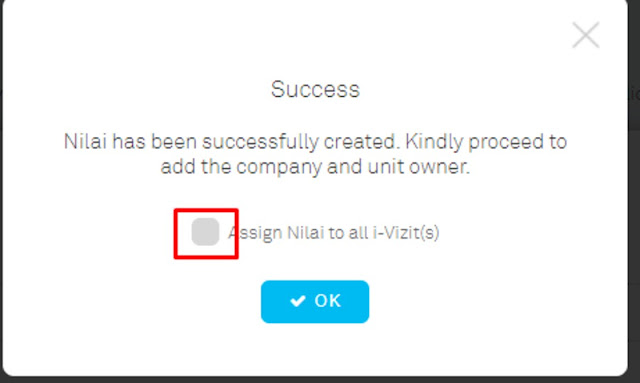
5.      If you are using the i-Vizit app on a tablet and would like to separate the viewing of the i-Vizit tablet for each specific location, untick Assign Location to all i-Vizit and then click on OK. You may ignore this if you are not using the i-Vizit app and proceed with clicking the OK button.


6.       Once successfully added, it will be listed in the Building section. Hover the mouse over the information icon to view details of the building or location. The address shown will also appear to the visitor in their visitation ticket based on the selected meeting location. Click on View to manage the building/location setting.


7.       Click on any unit to view the unit information and assign staff.


8.       Insert unit information, select Department/Division to assign. Once a department has been selected, the staff list will be updated based on the selected department. Click on the Add button to add more staff that do not appear in the list, or remove any staff from the list.


9.       Select staff to add. Then submit.

10.     Once successfully added, the unit information will be updated in the Building>Block module.


B. Invite Visitors with Meeting Location Selection
1.    From the Staff account, click on New Invitation.


2. Fill up visitor’s details and select Meeting Location accordingly. Then submit a copy link to be sent for visitors for their registration.


3.    Once an invitation has been created, send the invitation link to the visitor to confirm their personal information either by copying the invitation link or insert their email to send by email.


4.    After a visitor has submitted and confirmed their visit, a visitation ticket will appear. Address of the selected meeting location will be shown in the ticket. They may also download the ticket in a PDF form for future reference.

Note: If some of the screenshots or steps viewed here are different from the ones in the current system, this is due to our continuous effort to improve our system from time to time. Please notify us at info@timetec.com, we will update it as soon as possible.


0 comments:

Have any questions or inquiries about FingerTec? Drop your input here.