How to Set Multiple Meeting Locations in TimeTec VMS
Introduction
A feature in TimeTec VMS, which is Multiple Addresses, can be utilized for a company with multiple branches at different locations that allows the admin to set an address for each block, representing premises at different locations or branches. With the feature, employees assigned to the block will have their office address tally with their actual work address. Hence, when the employee is inviting visitors, the correct office address will appear on the visitor's invitation message. The employees are also given the option to select the meeting location when creating an invitation or confirming an appointment. Following will be the detailed steps on setting up and using this feature.
A. Setting Building (Location) Address
1. In TimeTec VMS, login as Admin, Go to Manage Company > Building
3. Insert details accordingly. Tick for the same as default company information if the location address and other details are similar to the current company details. Otherwise insert the new details accordingly. Then click on Next.
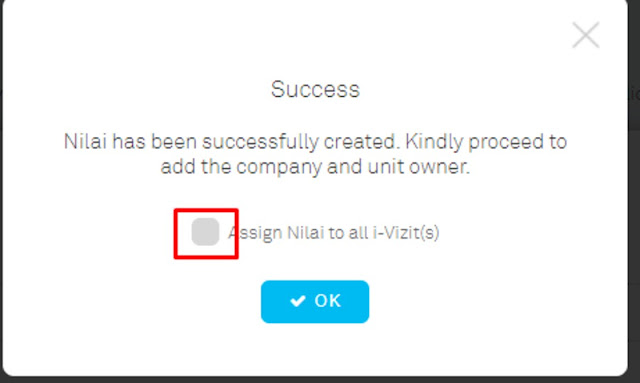
5. If you are using the i-Vizit app on a tablet and would like to separate the viewing of the i-Vizit tablet for each specific location, untick Assign Location to all i-Vizit and then click on OK. You may ignore this if you are not using the i-Vizit app and proceed with clicking the OK button.

6. Once successfully added, it will be listed in the Building section. Hover the mouse over the information icon to view details of the building or location. The address shown will also appear to the visitor in their visitation ticket based on the selected meeting location. Click on View to manage the building/location setting.
8. Insert unit information, select Department/Division to assign. Once a department has been selected, the staff list will be updated based on the selected department. Click on the Add button to add more staff that do not appear in the list, or remove any staff from the list.
B. Invite Visitors with Meeting Location Selection
1. From the Staff account, click on New Invitation.
2. Fill up visitor’s details and select Meeting Location accordingly. Then submit a copy link to be sent for visitors for their registration.
3. Once an invitation has been created, send the invitation link to the visitor to confirm their personal information either by copying the invitation link or insert their email to send by email.
4. After a visitor has submitted and confirmed their visit, a visitation ticket will appear. Address of the selected meeting location will be shown in the ticket. They may also download the ticket in a PDF form for future reference.
Note: If some of the screenshots or steps viewed here are different from the ones in the current system, this is due to our continuous effort to improve our system from time to time. Please notify us at info@timetec.com, we will update it as soon as possible.


0 comments:
Have any questions or inquiries about FingerTec? Drop your input here.