How to Set Working Locations in TimeTec TA
Introduction
These days, social distancing, self-isolation, or quarantine requirements have left many organizations with a physically dispersed workforce. Most have a significant percentage of staff having to work from home. For TimeTec TA subscribers, the clocking method for employees working away from the office may have also evolved to mainly GPS mobile clocking.
To help Admins or Managements monitor their worker’s daily work location, we introduced a new ‘Working Location’ feature. Admins can add multiple working locations for categorization/ classification purposes and tag these to the various clocking methods available in their account.
The system will then display a Working Locations Chart (at Admin Dashboard) with the clocking data organized according to those preset working locations.
Process
A. Add the ‘Working Locations’
1. Go COMPANY > Work Locations Settings
A. Add the ‘Working Locations’
1. Go COMPANY > Work Locations Settings
2. The system provides 3 default working locations (Work from home, Work on site, Work in office) that are editable but not removable and allows Admin to add new working locations (30 max).
‘+’ Icon: To add new Work Location
Pencil Icon: To Edit Work Location Name or Description
Dustbin Icon: To Delete the Work Location
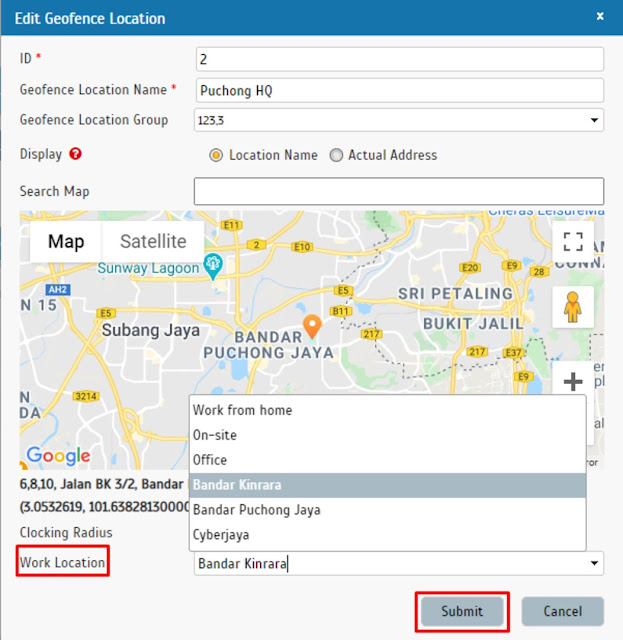
2. Click the ‘Pencil’ Icon to add the working location
3. Select the Working location and click ‘Submit’

C. Add ‘Working Locations’ to NFC/Beacon
1. Go to DEVICE > Mobile Clocking > NFC | Beacons.
2. Click ‘Pencil’ icon to edit work location and click ‘Update’ icon to save
D. Add ‘Working Locations’ to NFC/Beacon
1. Go to DEVICE > Mobile Clocking > WiFi Access Point
D. Add ‘Working Locations’ to NFC/Beacon
1. Go to DEVICE > Mobile Clocking > WiFi Access Point
2. Click ‘Pencil’ icon to edit work location and click ‘Tick’ icon to save
E. Add ‘Working Locations’ to Webster/Smart DBS Terminal
1. Go to DEVICE > Terminal
E. Add ‘Working Locations’ to Webster/Smart DBS Terminal
1. Go to DEVICE > Terminal
2. Click ‘Pencil’ icon to edit work location and click ‘Tick’ icon to save
F. Add ‘Working Locations’ to QF Master
1. Go to DEVICE > QF Master
1. Go to DEVICE > QF Master
2. Click ‘Pencil’ icon to edit work location and click ‘Tick’ icon to save
2. Select date to review employees’ work location. The chart will display the work location records based on the employees' latest clocking data.
3. Data Grid
• Allow Admin to view users’ clocking categorized under each working location.
• Included View Attendance button to redirect to Attendance module.
• Included Print button to generate and download user list as PDF
WORKING LOCATION ANALYSIS - MOBILE APP
1. If the user clock-in outside the GPS Geofence area, they are required to define their working location manually.


0 comments:
Have any questions or inquiries about FingerTec? Drop your input here.