How to Set Restriction on Carry Over Balance in TimeTec Leave

Thursday, July 22, 2021 TimeTec 0 Comments


Introduction
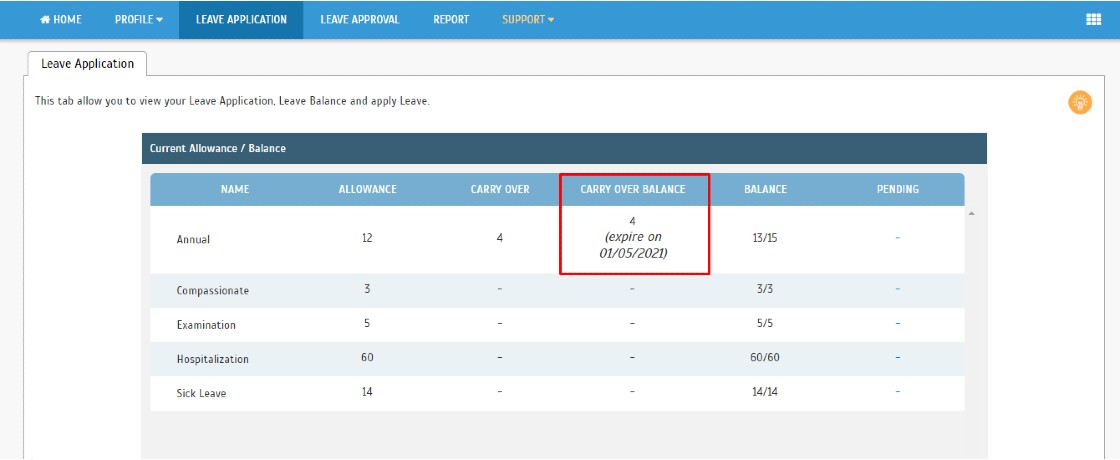
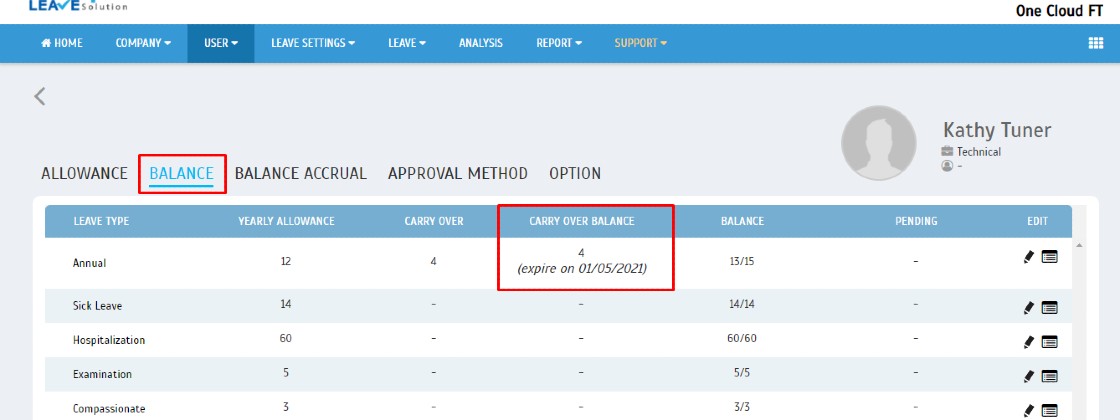
When holidays are approaching, employees will start to look at all the leftover leaves they have over the year. Typically, some companies allow employees to carry specific leaves into the following year, but with restrictions on the carry-over balance. Here, you may set the restrictions and expiry date to the selected carry over leaves. 

Process
1. Go to Leave Settings > Leave Policy

2. Select Policy > Edit

3. Select Leave Type > Edit

4. Click on ‘Apply and use leave before’ > Update > Click OK
Remark : This option only shows up when the leave type is carried over with an expiry date.

5. User Leave Setting (Admin View)
    i) Allowance tab (Change in the expiry date will recalculate carry over expiry date based on     last renewal date).

    ii) Balance tab displays the carry over balance with an expiry date based on setting and last     renewal.
    a) Before renewal

    b) After renewal

6. User Leave Setting (User View).
    i) Balance (After applied leave).

    ii) User leave type view – display carry over balance and expiry date.

7. Report.
    i) User Leave Summary

    ii)User Leave Balance

Note: If some of the screenshots or steps viewed here are different from the ones in the current system, this is due to our continuous effort to improve our system from time to time. Please notify us at info@timeteccloud.com, we will update it as soon as possible.


0 comments:

Have any questions or inquiries about FingerTec? Drop your input here.

How to Set TimeTec TA/TimeTec Leave Application Library

Thursday, July 22, 2021 TimeTec 0 Comments


Introduction
TimeTec TA is exceptional for its remote capabilities that allow employees to clock in/out securely via web or mobile from user smartphone. In addition, TimeTec Leave Solution eases the leave process and quickens the leave approval through the e-Leave management system. Besides that, the TimeTec application also has its library that allows you to store any memos or employee handbooks in the application, which users can download from the application.

Steps

1. To set the company's library application, please login into your TimeTec account.
(www.timetecta.com / www.timetecleave.com

2. Go to Company Module > System Setting.

3. Go to Library > Select “ + “ icon to add the library file > submit.

Remark: All the documents uploaded will be available for employees on the Web > Home and on the App > My Profile. Supported formats are pdf, jpeg, jpg, png, and the max file size is 10MB.

Application:
1. Login to the TimeTec application

2. Go to Menu > Click on user picture/profile

3. Select the library and download the available PDF file.


Note: If some of the screenshots or steps viewed here are different from the ones in the current system, this is due to our continuous effort to improve our system from time to time. Please notify us at info@timeteccloud.com, we will update it as soon as possible.


0 comments:

Have any questions or inquiries about FingerTec? Drop your input here.

How to Integrate Turnstile with Timetec device on Timetec Access

Thursday, July 22, 2021 TimeTec 0 Comments


Introduction
A turnstile is a form of gate that provides access to an individual at a time. It can also enforce one-way traffic for the community and restrict passage to only authorized individuals. For example, this setup is suitable for the lobby of an office building. With this setting in place, it will allow access to authorized individuals only; while at the same time preventing strangers from tailgating into the premises. Following the setup, users can use TimeTec Access to view the data from any place by computers or smartphones.

TimeTec Devices
1. There are two types of devices that you can use, which are:
    Fingertec Biometric Device(Door Access) - Face ID 5/TD , Q2i , or R3
2. IoT Controller - BLE-2


Process
1. Set Up and Wiring Diagram for Biometric Device

    a. Wiring diagram between FingerTec Biometric device and turnstile
 
             Connector pin at back of the device

    b. Activate device on TimeTec Access
    - For Face ID 5, refer to this link 
    - For FingerTec device, refer to this link

2. Set up and wiring diagram for IoT Controller
    a. Wiring diagram between IoT Controller and Turnstile
Connector pin of BLE-2 controller

    b. Activate BLE-2 controller on TimeTec Access, refer to this link.

3. Manage User and Access group on TimeTec Access
    -You may refer to this link for further details.

4. On the TimeTec Access homepage, you can monitor all employees' access records and print the report.


Note: If some of the screenshots or steps viewed here are different from the ones in the current system, this is due to our continuous effort to improve our system from time to time. Please notify us at info@timeteccloud.com, we will update it as soon as possible.


0 comments:

Have any questions or inquiries about FingerTec? Drop your input here.

Troubleshoot the ‘Total 0 new transaction log(s) downloaded’ Issue for TCMSv3/Ingress

Wednesday, July 21, 2021 TimeTec 1 Comments


Introduction
There are cases in which clients have not downloaded new transaction logs from their device yet, but the system shows a ‘Total 0 new transaction log(s) downloaded’ message as shown below after they completed the download process.


Many possibilities can cause this, such as:
·         Intermittent connection of the device
·         The software (TCMSv3 / Ingress) database
·         The software (TCMSv3 / Ingress) version
 
Process
To troubleshoot the issue, follow the steps below:
 
1) Go to Attendance module > Data Audit List > Select the date range > Search to confirm that the latest transaction logs have not been downloaded to the software yet.

2) Connect the device to FT Device Info tool from the following link. Key in the device’s IP > Connect > Download Transactions to confirm that the latest transaction logs are available in the device.
 
https://s3.amazonaws.com/files.fingertec.com/Husna/Basic+Tool/FTDevInfo.exe
 

Once confirmed that the latest transaction logs are available in the device but not in the software, proceed with Step 3.
 
3)
i) For TCMSv3 / Ingress MDB
    a) Close the software
    b) Repair its database by following the tips from the link below
    https://www.fingertectips.com/2016/10/resolve-failed-to-initialize-database.html
    c) Run the software > Delete the device from the software and re-add it. Once the device is     successfully added, try to download the transaction logs from the device again.

ii) For Ingress MySQL
    a) Close Ingress application and shut down Ingress Server
    b) Go to Control Panel > Administrative Tools > Services > Restart MySQL, Ingress service     and Attendance Service
    c) Go to Start > All Program > FingerTec Ingress > Ingress DB Installer > Key in MySQL         password > Test Connection > Update Connection > Upgrade Database


    d) Run Ingress > Delete the device from the software and re-add it. Once the device is             successfully added, try to download the transaction logs from the device again.

 
4) If the issue persists, reinstall the software by following the steps below:
i) For TCMSv3 / Ingress MDB
    a) Backup your database in System Settings > Database Configuration > Database
    Management > Backup
    b) Uninstall current TCMSv3 Software from the Control Panel
    c) Rename TCMSv3 folder which is located in Local Disk C > Program Files (x86) >                 FingerTec > TCMSv3 as "oldTCMSv3"
    d) Install the latest TCMSv3 installer below
    https://www.fingertec.com/softwareupdate/TCMSV3/software-tcmsv3_download_e.html
    e) Run TCMSv3 Software and restore the backup database.

ii) For Ingress MySQL
    a) Backup your database in System Settings > Database Configuration > Database                 Management > Backup
    b) Uninstall FingerTec Ingress from the Control Panel
    c) Install the latest Ingress version from the link below
 
Ingress Server:
https://www.fingertec.com/softwareupdate/ingress/software-ingress_download_e.html
 
Ingress Client:
https://www.fingertec.com/softwareupdate/ingress/software-ingress-client_download_e.html


Note: If some of the screenshots or steps viewed here are different from the ones in the current system, this is due to our continuous effort to improve our system from time to time. Please notify us at info@timeteccloud.com, we will update it as soon as possible.


1 comments:

Have any questions or inquiries about FingerTec? Drop your input here.

How to Manage Visitor Details in TimeTec VMS

Wednesday, July 21, 2021 TimeTec 0 Comments


Introduction
In managing and monitoring visitors, certain information must be recorded, including visitors' names or contact details. However, a company can customize these personal data based on the organization's requirements. In TimeTec VMS, configure and customize the Visitor Details accordingly for this purpose. 
This article is the guide to manage the Visitor Details in TimeTec VMS.

Process
1. Login as Admin, go to Settings > Visitation Settings

2. In the Settings page, go to Visitor Details, then click on Edit button to configure the Visitor Details.

3. For certain default field data, you may set them as a mandatory field, optional or disabled, if it is not required.

4. To add any additional field, click on + More Custom Field button under Personal Details or Visitation Details section. Insert the name of the field data and then submit.

5. Once saved, click on the Edit button once again to set if the added fields are compulsory or an optional field or whether you need to delete the added fields.

6. The Visitor Details during registration will be based on the configuration of Visitor Details.

Note: If some of the screenshots or steps viewed here are different from the ones in the current system, this is due to our continuous effort to improve our system from time to time. Please notify us at info@timeteccloud.com, we will update it as soon as possible.


0 comments:

Have any questions or inquiries about FingerTec? Drop your input here.

Manage User and Access Data in QF Master

Tuesday, July 13, 2021 TimeTec 0 Comments


Introduction

TimeTec QF Master is an access control system in the form of a mobile App in Android devices, where each QF Master is a unique access point that controls each door's IN and OUT activities when paired with a TimeTec BLE-2 via a Bluetooth connection. QF Master is the smart Android app designed to authenticate a person's face to justify the person's access permission. The face recognition algorithm can cater to up to 10,000 face templates with 1:N verification and store up to 1,000,000 transaction data inside the Face Master. QF Master is compatible with other TimeTec solutions such as TimeTec TA for attendance clocking, and TimeTec Access, TimeTec VMS and iNeighbour for door access. More information for QF Master is available at this link.

Process

1. Setup QF Master
Activate the QF Master in the TimeTec account; there is an additional charge for the QF Master. Please follow the steps to activate the application.

    a) For Timetec TA (Attendance), please refer to this link
    b) For Timetec Access (Door Access), please refer to this link
    c) For Timetec VMS (Visitor Management), please refer to this link.

2. Face Enrolment
    a) To enrol a user's Face via QF Master, click on 'Settings' icon at the bottom left corner > Login to the Admin account.


    b) Select Users Management > search User > click on Face’s icon to start enrolment >
Capture user’s face and click Submit to Save.


3. QF Master configuration explained

    a)Tap on Language to change QF Master’s language to English or Chinese Simplified.


    b)Tap on Date Format or Time Format to change QF Master date and time format.


    c) You may enable the ‘Return to Home page after verification’ to set the QF Master to return to the selection page after the user is verified. You may also disable it to set the QF Master to always be in scanning mode.

    d) There is a screensaver on QF Master during idle mode. By default, the screensaver will stop and start scanning when it detects any motion in front of the camera. If this feature is disabled, the user needs to tap on the screen to stop the screensaver to verify himself.

    e) For network security level settings, please refer to your IT or network personnel. By default, this feature is enabled.

    f) Other information:
        - Connected Hardware is a BLE2 controller (MAC Address) that QF Master connected to. 
        - Mobile ID is a unique ID for QF Master activation
        - Android version is the version of the smartphone’s firmware
        - App version is QF Master app version

4.  To check a user record on QF Master, tap on Access Records. Here you may filter the data by Date, Time or User Name.


Note: If some of the screenshots or steps viewed here are different from the ones in the current system, this is due to our continuous effort to improve our system from time to time. Please notify us at info@fingertec.com, we will update it as soon as possible.


0 comments:

Have any questions or inquiries about FingerTec? Drop your input here.