How to generate Form 11 and 20 in i-Account

Thursday, December 30, 2021 TimeTec 0 Comments


Introduction
The Management office usually sends form 11 or Form 20 after sending reminders to the defaulters. Developers, JMBs and MCs, may serve a notice of demand in Form 11 or Form 20, respectively, to defaulters to demand the payment of the outstanding charges. Forms 11 and 20 are available in the Second Schedule of the Strata Management (Maintenance and Management) Regulations 2015. 

Refer to the steps below to generate Form 11 or Form 20 in i-Account:
Notice of Demand
1. Go to Property > Overdue > Notice of Demand to generate Form 11 or Form 20. 

2. Next, at the Reminder Letter page, select either Form 11 or Form 20 at the top right of the page. 

Next, proceed to step 3 below.
Generate Form 11
The steps to generate Form 11 are as below:
i. The Admin needs to fill in all the required details:

No.
Options
Details

1.
Due to
The Admin needs to select an option: 
i) Developer
ii) Joint Management Body
2.
Cut Off Date
This is the cutoff date for the outstanding invoices. Therefore, the balance displayed will include dated invoices on and before this date. For example, if the cutoff date is 31/12/2020, the balance will include the outstanding invoices with document dates on 31/12/2020 and prior. 
3. 
Amount More than (RM)
The system will generate a reminder if the owner's outstanding invoice balance (less open credit) until the cutoff date exceeds the entered amount. All allocated payments (until today, i.e. form generation date) will reduce the outstanding invoice balance. 
4.
Payment Period
The Admin needs to set the payment period either by weeks or days, for instance, 14 days or 2 weeks. 
5.
Customer Group
Select 1 option only from the menu.

ii. Next, the Admin needs to fill in the details to be printed on Form 11.

No
Options
Details
1.
Name of Development Area
Set the name for the development area, for example, Cyberia Smarthome Residences.
2.
Date of NOD
Select the appropriate date for the NOD.
3. 
Authorized Person
Name for the Authorized person, for example, Aiden Teh.
4.
Designation
The Designation of the Authorized Person, for example, Building Manager.

Generate Form 20 
Generate Form 20 as per the below steps:
i. The Admin needs to fill in all the required details:

No.
Options
Details
1.
Cutoff Date
This is the cutoff date for the outstanding invoices. Therefore, the balance displayed will include dated invoices on and before this date. For example, if the cutoff date is 31/12/2020, the balance will include the outstanding invoices with document dates on 31/12/2020 and prior. 
2.
Amount more than RM
The system will generate a reminder if the owner's outstanding invoice balance (less open credit) until the cutoff date exceeds the entered amount. All allocated payments (until today, i.e. form generation date) will reduce the outstanding invoice balance. 
3.
Payment Period
The Admin needs to set the payment period either by weeks or days, for instance, 14 days or 2 weeks. 

ii. Once the Admin fills in all the required details, he needs to fill in all the information to be printed on the form. 
Additional Notes: Can refer to the explanation for Form 11.

Continuation 
3. When you are done, click on the “Add New” button at the bottom of the page to generate the Form 11 or Form 20.

4. Once Form 11 or Form 20 is successfully generated, this pop up message will appear.

5. The Admin can view the list of Form 11 or Form 20 that are successfully generated inside the batch list as per below: 

Form 11

Form 20

6. You can proceed with one of the actions below: 

Sample Form 11

Sample Form 20 

Note: If some of the screenshots or steps viewed here are different from the ones in the current system, this is due to our continuous effort to improve our system from time to time. Please notify us at info@timeteccloud.com, we will update it as soon as possible.


0 comments:
Have any questions or inquiries about FingerTec? Drop your input here.

How to Check Transactions of Previous Owners in i-Account

Thursday, December 30, 2021 TimeTec 0 Comments


Introduction
Eventually, there will be instances of sale or sub-sale of a unit in a property. When this happens, and the management is notified, the Admin has to change the unit owner information and add the new owner into iNeighbour. Refer to the steps for changing owner in this link: https://www.fingertectips.com/2021/01/changing-unit-owner-in-i-account.html
The previous owner will be deactivated in i-Account and hidden from the dropdown menu selection on all the transaction entry pages. To activate or reactivate the previous owner for entry of new transactions (e.g. issue receipt) or to check records, please refer to the following steps: 

A. Reactivate the Previous Owner Account
1. Go to Accounting > Sales > Maintenance > Customer to reactivate the status for the previous owner.

2. Firstly, the Admin needs to tick this checkbox to view the dropdown listing that includes all Inactive owners. 

3. Select the previous owner name from the dropdown listing.

4. Change the Customer Status to Active. 

5. Click “Update Customer” to save the changes.

6. This pop up message will appear once the changes are successfully updated.

B. Check the Transactions for Previous Owner
1. Go to Accounting > Sales > Inquiries > Customer Transaction Inquiry to check all transactions of the previous owner. 

2. Select the previous owner name from the drop down listing. 

3. Select “All Type” and set the appropriate date range for the transaction period. Click the “Search” icon to proceed. 

4. The system will list down all transactions of the previous owner based on the date range settings. The Admin has the options to print or export the listing into Excel. 

5. Once the Admin has reactivated the previous owner, he can issue transactions to the previous owner such as issue receipt or invoices. 

C. Deactivate the Previous Owner Account
1. If Admin needs to deactivate the ex-owner account, Admin can refer to the steps and example at section “A. Reactivate the Previous Owner Account”.

2. Change the Customer Status back to Inactive and click on “Update Customer”.

Note: If some of the screenshots or steps viewed here are different from the ones in the current system, this is due to our continuous effort to improve our system from time to time. Please notify us at info@timeteccloud.com, we will update it as soon as possible.


0 comments:

Have any questions or inquiries about FingerTec? Drop your input here.

How to Set Claim Approver in TimeTec Claim

Thursday, December 30, 2021 TimeTec 0 Comments


Introduction
TimeTec Claim is a solution that provides convenient employee claim management for various types of companies. First, start by assigning approvers directly to every user and then determine the type of approval needed.  There are two methods for adding claim approvers, the first is by a single user, and the second is a batch update.

Process
A. Single User
1. Go to User > Manage user.

2. Select User > Click on Settings (Gear Icon).

3. Go to Approval Method Tab > Click Edit.

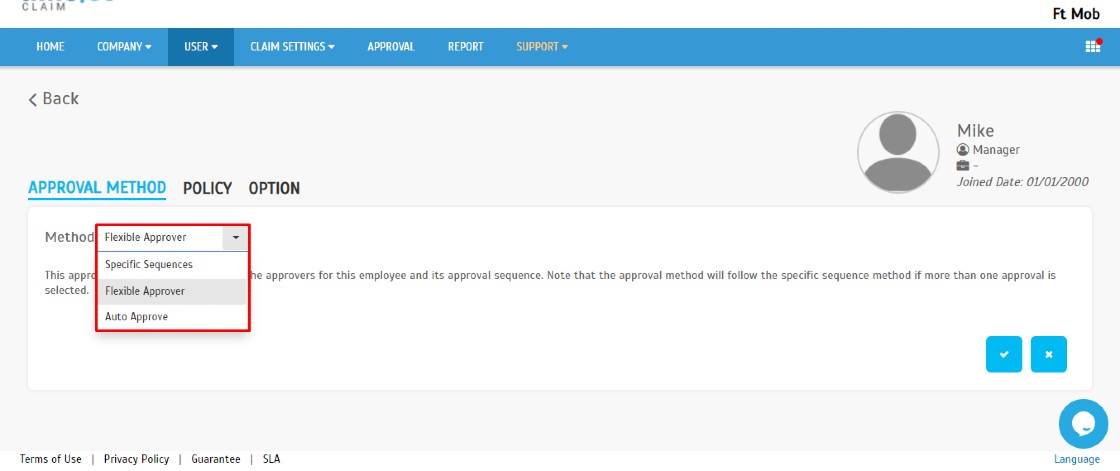
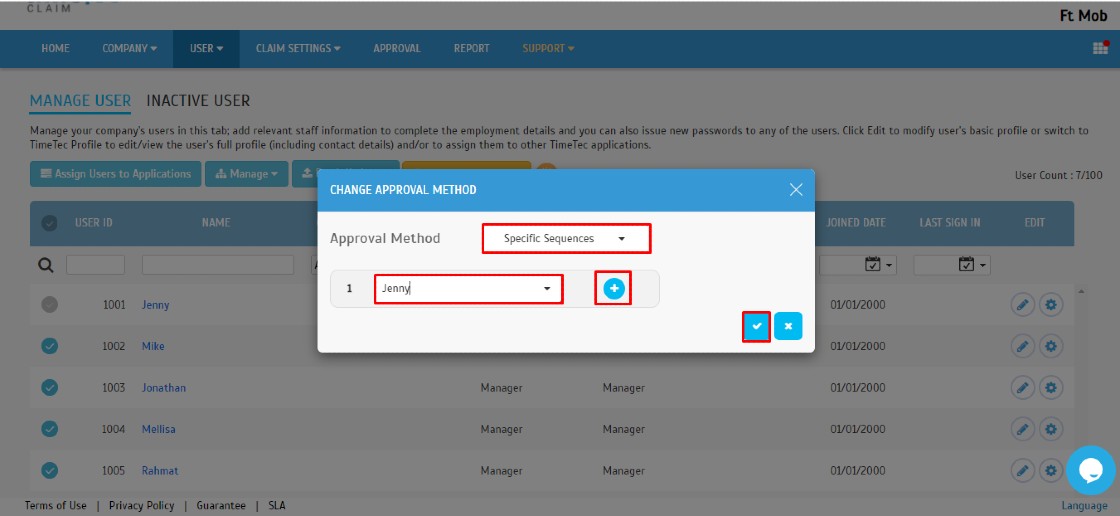
4. Select Approval Method. There are 3 types of Approval Method :
i.Specific Sequences: This approval method lets you set the approvers for this employee and its approval sequence. Please note that the approval process will follow the sequence set, which means that the second approver cannot do an approval until the first approver has done his for the employee's expense report.
ii. Flexible Approver: This approval method lets you set the approvers for this employee and its approval sequence. Note that the approval method will follow the specific sequence method if more than one approval is selected.
iii. Auto Approve: This approval method will auto-approve all claim applications submitted by this user.

5. For Specific Sequences Approval Method, you can add more than one user as approver by clicking the Add More (+ symbol) > Submit.

B. Batch Update
1. Repeat step A (1) > Select User > Click Batch Update > Change Approval Method.

2. Select Approval Method > Select Approver > Click + Symbol to Add More than 1 approver > Submit.


0 comments:

Have any questions or inquiries about FingerTec? Drop your input here.

Setting Up NFC Checkpoint Tags for TimeTec Patrol

Thursday, December 30, 2021 TimeTec 0 Comments


Introduction
TimeTec Patrol App is a mobile application of TimeTec Patrol, a cloud-based patrol management system. Patrol personnel can perform duty using this App by tapping the phone on NFC tags along the assigned route. In this article, we will demonstrate how, as an admin, to set up the NFC checkpoint tag.

Process
1. Please ensure that checkpoint location and patrol route has been set. You may refer here to set the Patrol Route (https://www.fingertectips.com/2020/04/how-to-create-patrol-routes-and-assign.html).

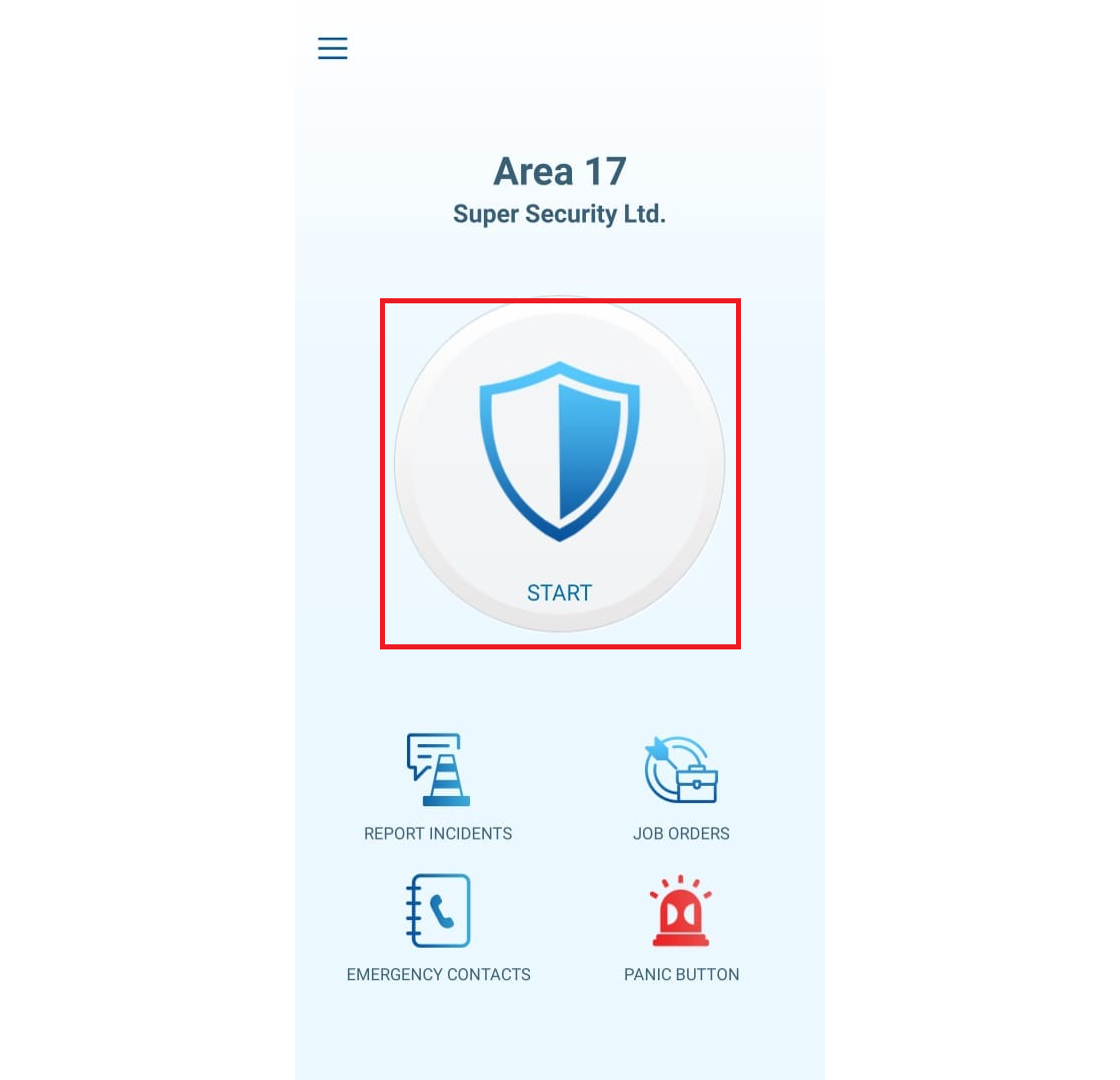
2. Once the above has been configured, login as admin in TimeTec Patrol mobile app, then tap on the Start button.

3. Tap on Enroll Checkpoints button to enrol the checkpoint tag. Please note that only system administrators who have been given access rights can see the Enroll Checkpoints button. Kindly review the system role settings if the Enroll Checkpoint button is unavailable in your login account.

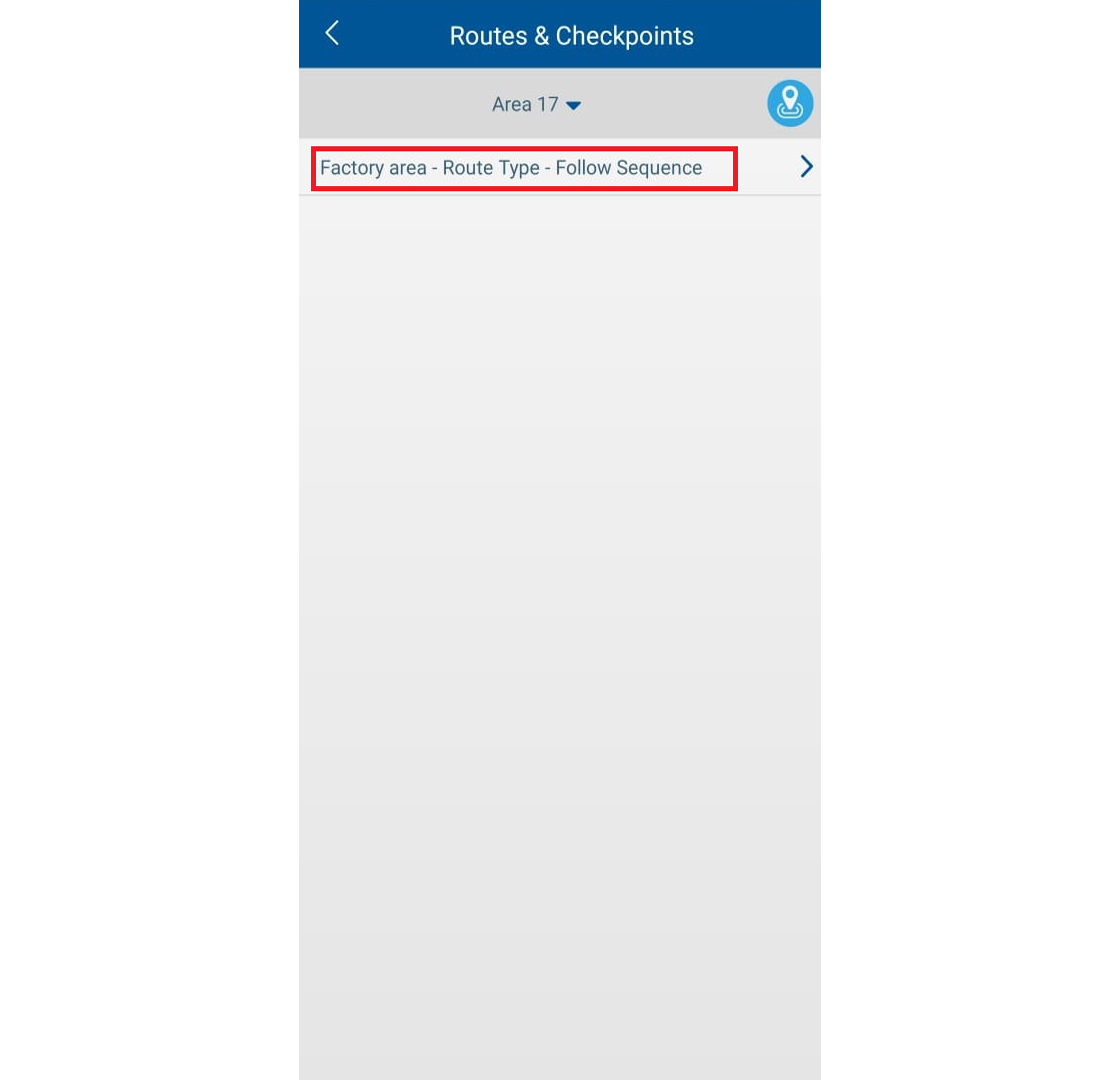
4. Tap on the Patrol Route to enroll the checkpoints within the route.

5. Disenrolled checkpoint status will be shown as grey dot, while green dot represent the enrolled checkpoint. Tap on the checkpoint location you want to enroll in on the NFC checkpoint tag.

6. When the screen displays the below screenshot, tap the phone on the NFC tag to enroll the checkpoint tag.

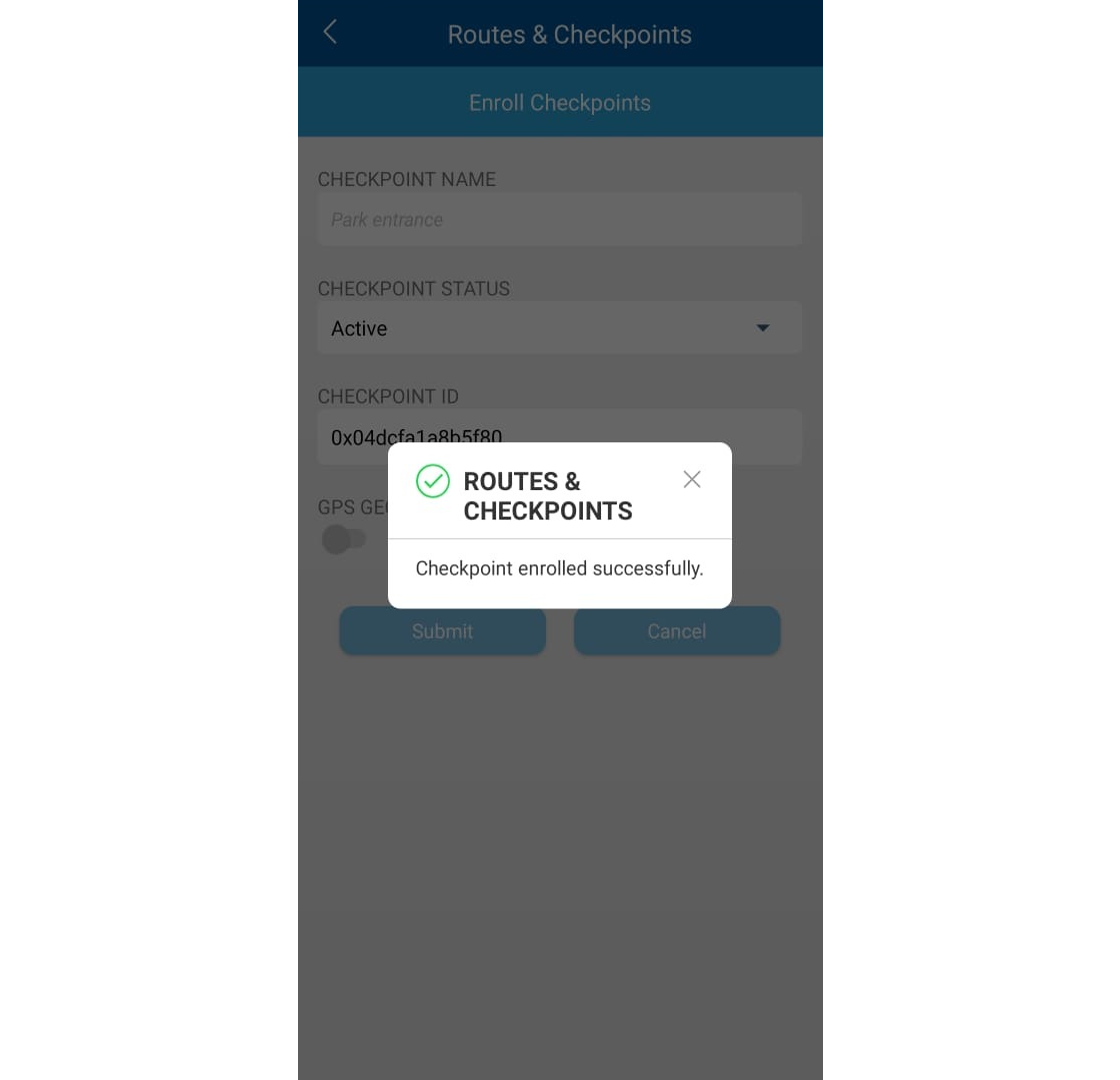
7. The below popup message will pop up when the enrollment is successful.

8. Upon successful enrollment, a checkpoint ID will be captured and shown here. Click on submit to proceed.

9. Checkpoint status will turn from grey to green, indicating that the checkpoint tag has been enrolled. Guards may now proceed with patrolling.


Note: If some of the screenshots or steps viewed here are different from the ones in the current system, this is due to our continuous effort to improve our system from time to time. Please notify us at info@timeteccloud.com, we will update it as soon as possible.


0 comments:

Have any questions or inquiries about FingerTec? Drop your input here.

How to Manage Terms and Conditions in TimeTec Parking

Tuesday, December 28, 2021 TimeTec 5 Comments


Introduction
In any given situation, terms and conditions clarify what should happen. They lay out the critical business terms you're offering your customers and make it easier for them to grasp their obligations, rights, roles, and responsibilities.
In TimeTec Parking, the system admin must create and assign the Terms and Conditions for season pass users, and the users must agree to the Terms and Conditions before signing up or buying season passes.

Process
1. Go to Season Pass > Term and Condition > click Add button


2. Name the Terms and Conditions, if it is different for other season pass groups. Write the terms and conditions in the box below and click the Submit button to save.

3. The Terms and Conditions will appear in TimeTec Parking Apps/Web when a user buying a season pass.


Note: If some of the screenshots or steps viewed here are different from the ones in the current system, this is due to our continuous effort to improve our system from time to time. Please notify us at info@timeteccloud.com, we will update it as soon as possible.


5 comments:

Have any questions or inquiries about FingerTec? Drop your input here.